


Plant Watering Device
Background
My roommate and I were out of town for a few weeks for winter break. Before we left for break, my roommate was concerned that our cute house plant would die from dehydration. As a product engineer, I would not let this happen. So the night before I headed out to Toronto, I rapidly built a Plant Watering Device that could automatically water our plant every 1.5 days.
Design and Development
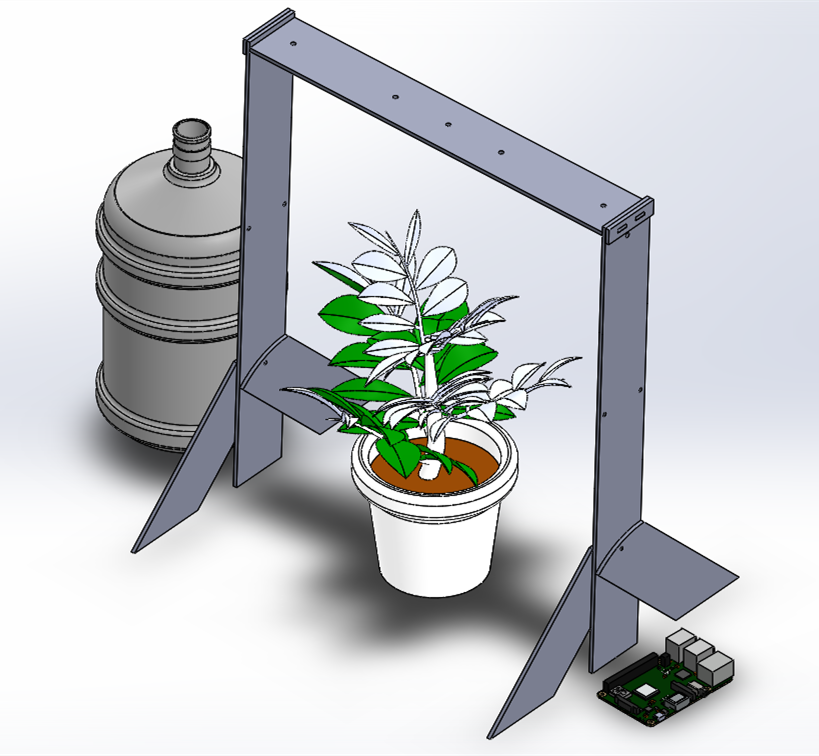
The Plant Watering Device contains a Raspberry Pi 3 Model B+ mini computer and an air pump motor. Every 1.5 days, the mini computer would turn on the air pump that pumps air into the water tank for 2 seconds through a vinyl tube. There is another vinyl tube with one side submerged into the water tank and the other side sit on the Plant Frame facing down the plant. When air enters the water tank, air tries to escape and pushes the water out to water the plant.
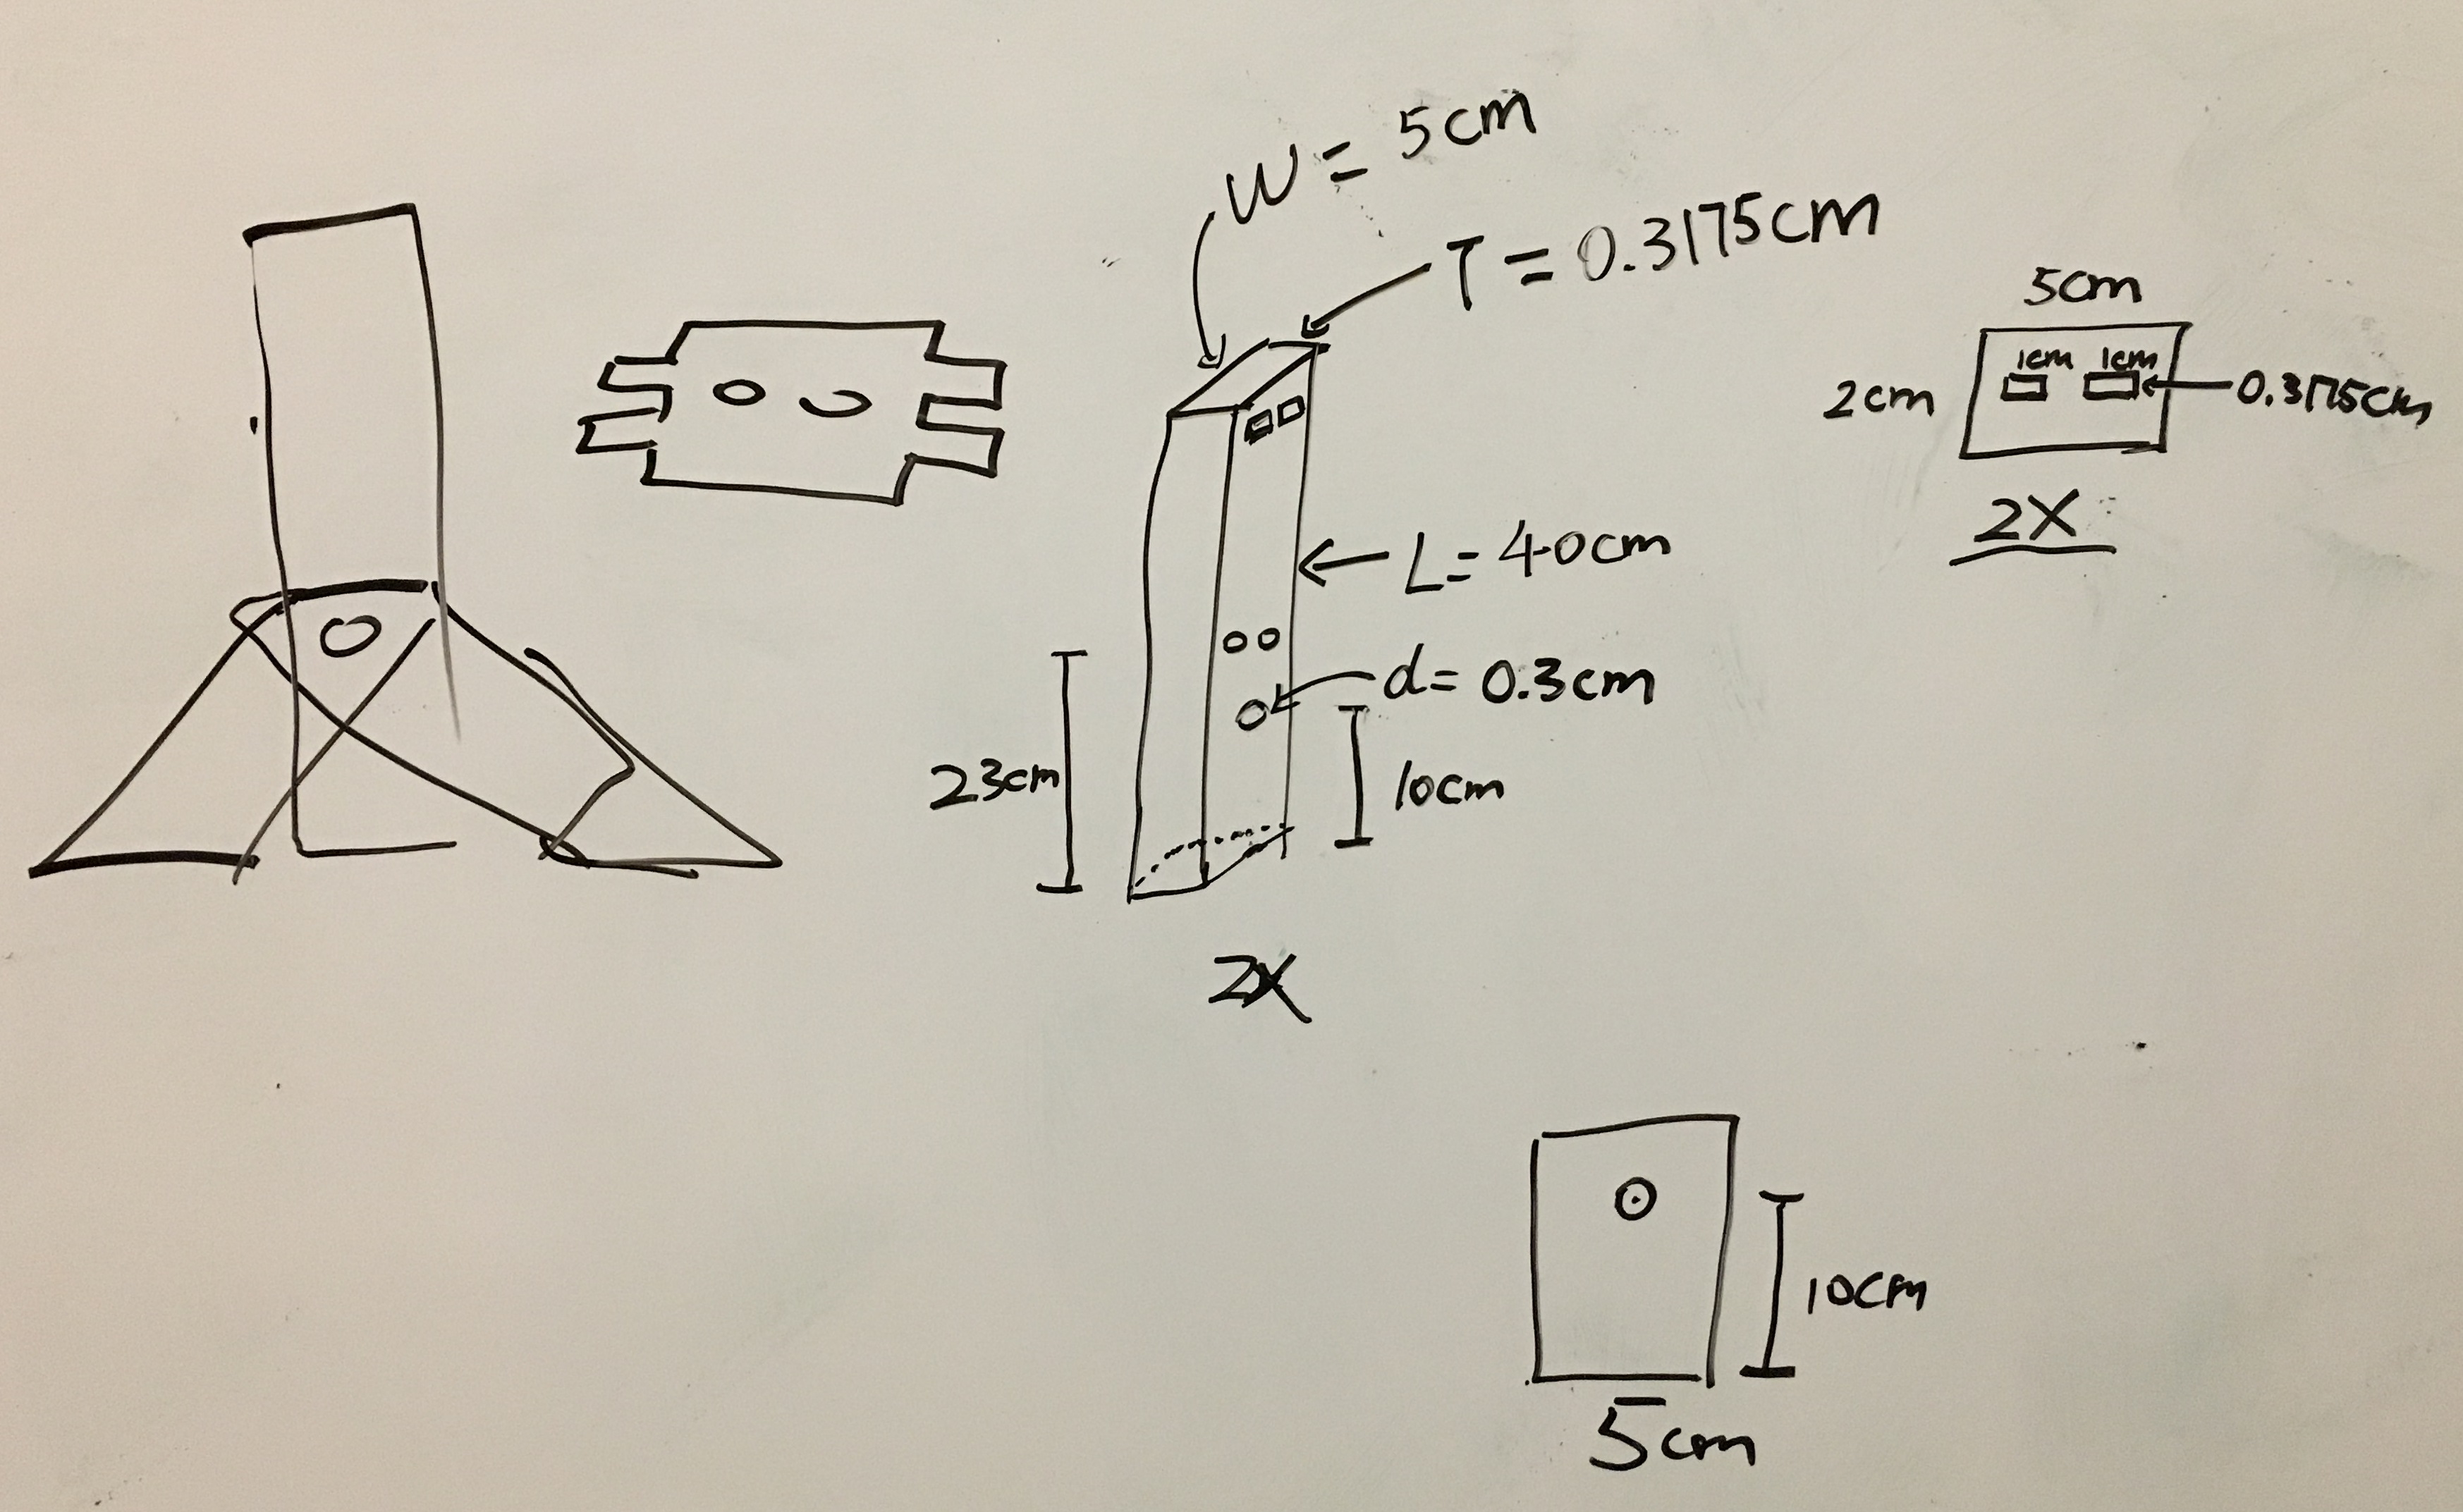 For the mechanical side, I designed a Plant Frame to mount the vinyl tube. I first brainstormed and
sketched out a Plant Frame design on whiteboard, then added the exact dimensions after measuring the
size of our house plant.
For the mechanical side, I designed a Plant Frame to mount the vinyl tube. I first brainstormed and
sketched out a Plant Frame design on whiteboard, then added the exact dimensions after measuring the
size of our house plant.
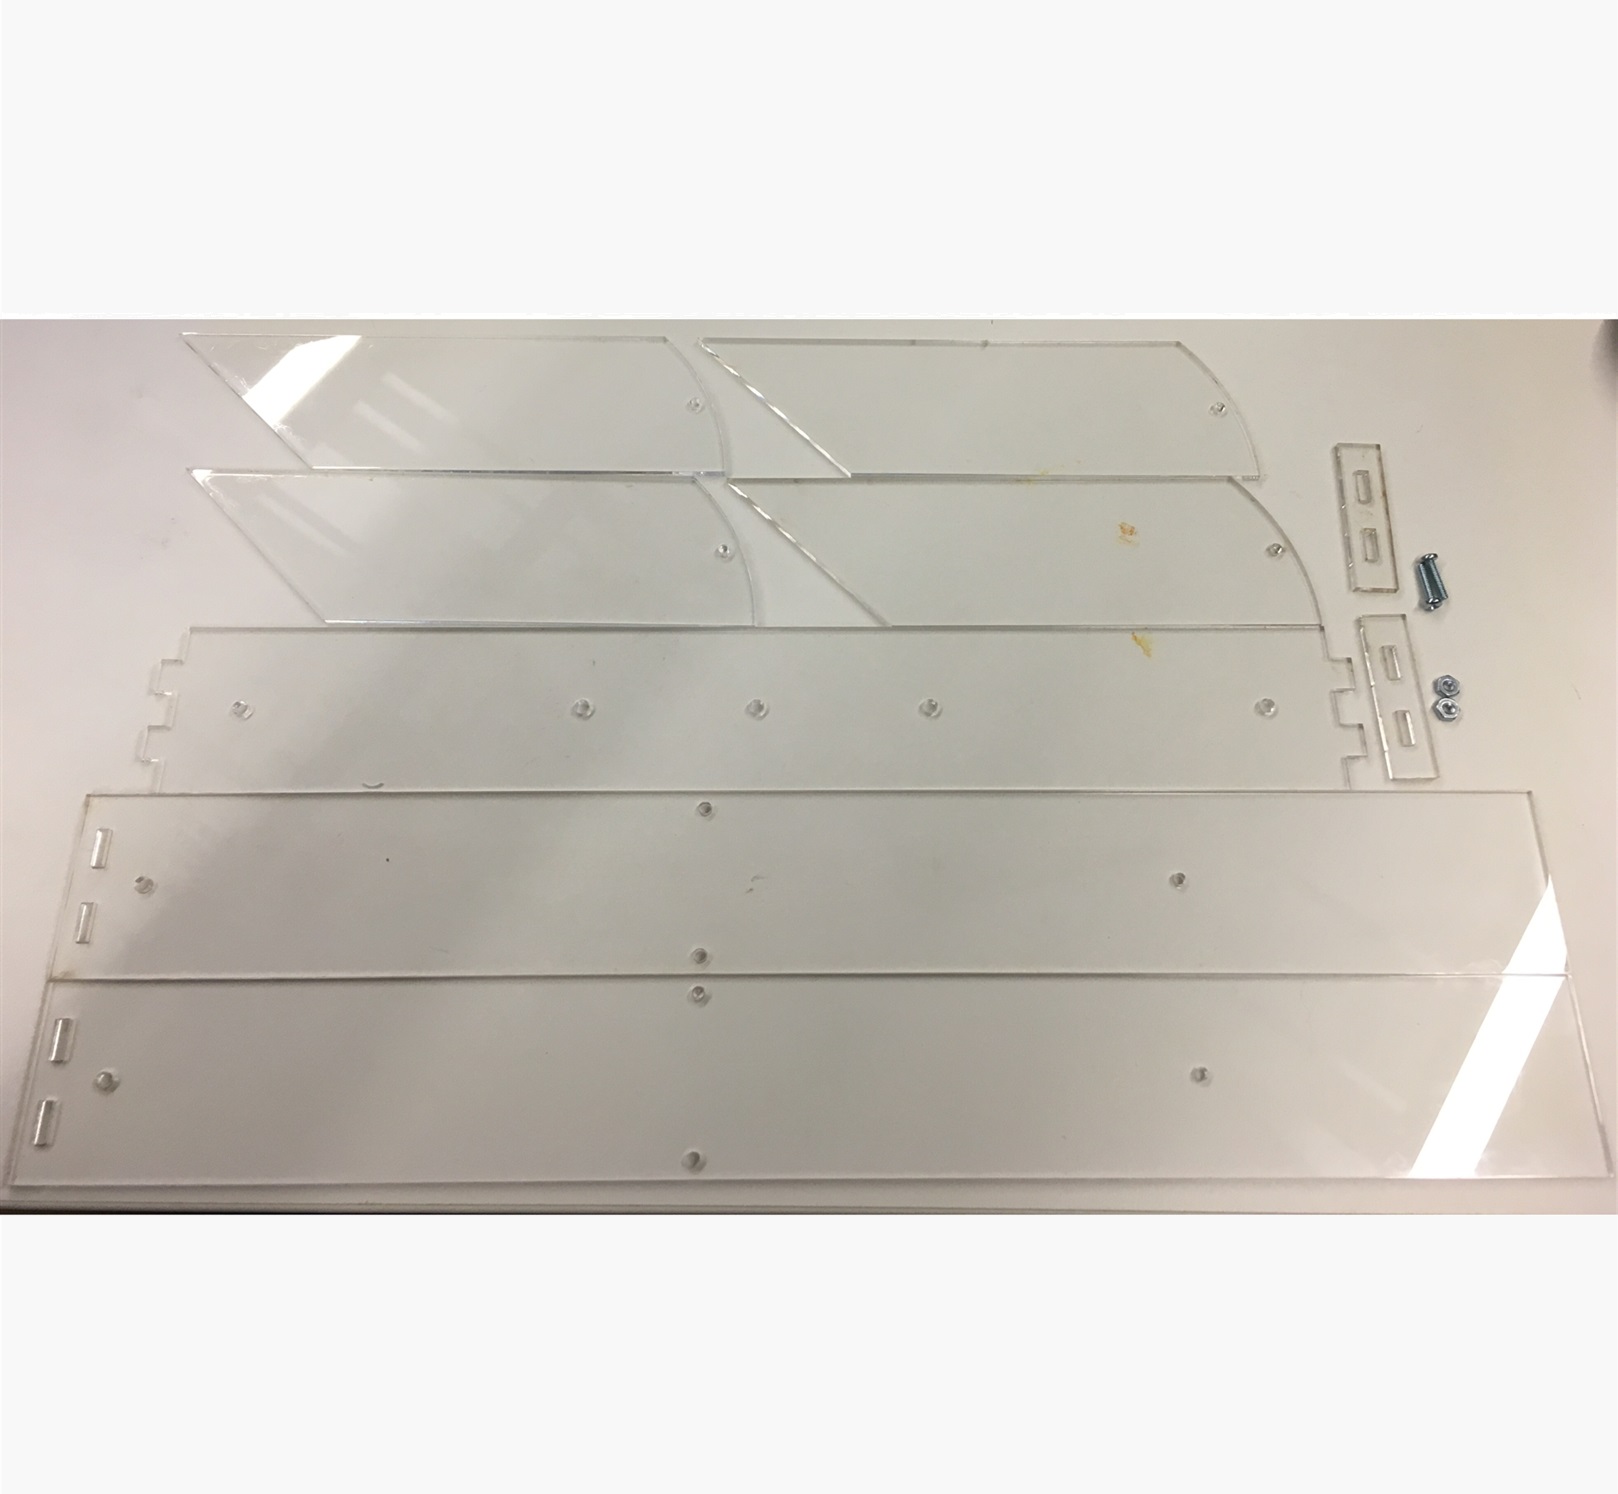
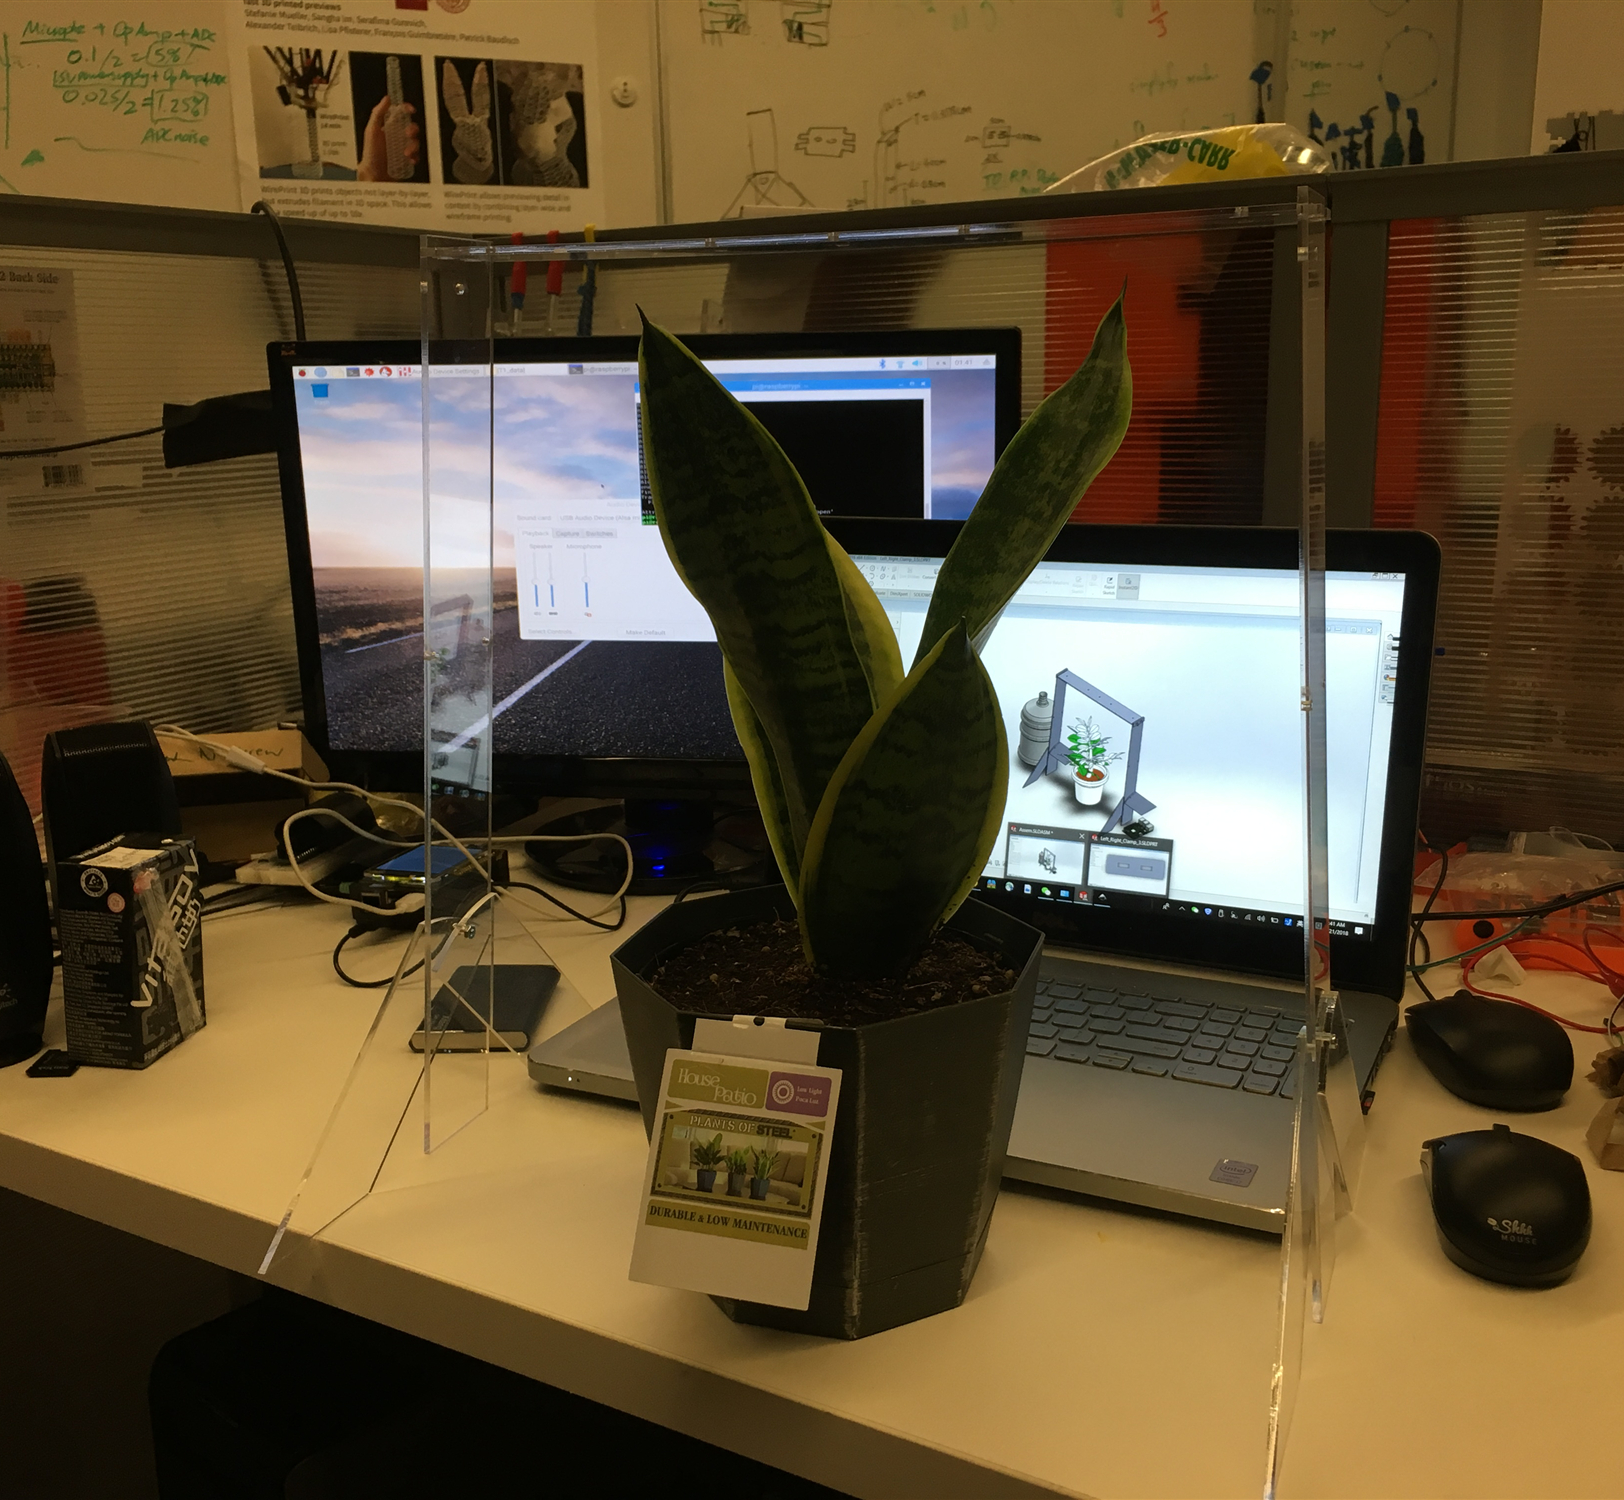
Because I started making the design the night before I left for break, I didn’t have much time and decided the fastest way to make the Plant Frame is laser-cutting the parts and connecting them together. I created 4 unique parts files in Solidworks and modeled the assembly design. These files can be found at this link. The model looked fit and great so I exported the parts as dxf files for laser-cutting acrylic and then assembled them.
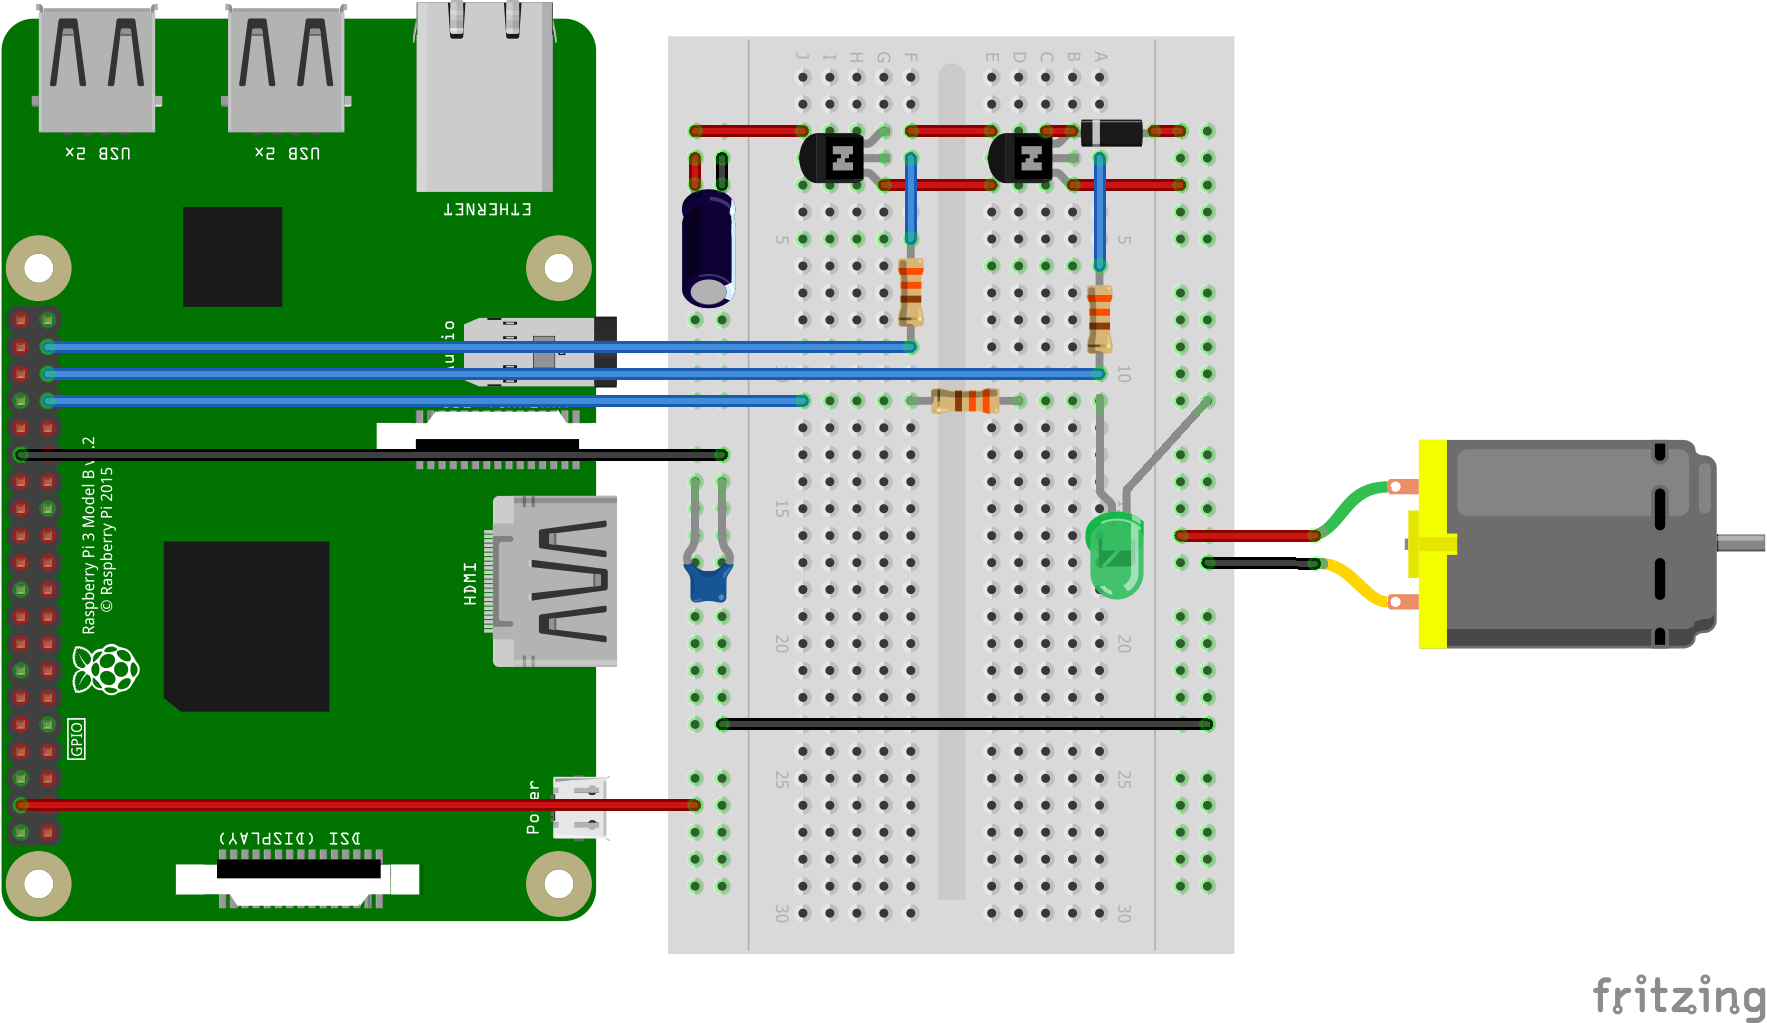 For the electrical side, the essential part is the motor driver circuit, the set up where the
Raspberry Pi interacts with the air pump motor. The motor driver circuit contains a 1N4001 diode,
an air pump motor, two 2N2222 NPN BJT transistors and two 330 ohm resistors. The air pump motor I used
is rated at 6V and draws roughly 1A of current at peak. (Beware that Raspberry Pi
GPIO pin can only provide a maximum of 16mA [source].
And one should not use the GPIO pin to directly control or power any current consumed heavy component such as a motor.)
The 2N2222 NPN BJT transistor is a current
controlled current source. To avoid heating up the transistors, two transistors are used instead of
one. GPIO 19 and GPIO 26 of the Raspberry Pi are connected to the two transistors respectively with 330 ohm resistors in
between to limit the input current flow to base to be 3.3V/330 ohm = 10mA (Raspberry Pi GPIO pins are 3.3V).
Based on the datasheet, at room temperature (~25°C),
DC current gain of 2N2222 is at least 60 for standard application where I_C < 500mA. This means the motor
driver circuit supports total current drawn of at least 60*10mA*2 = 1.2A, which is greater than the 1A peak
current drawn of the air pump motor. The 1N4001 diode is used as a flyback diode to protect the transistor
from motor voltage spikes and back EMF. Two capacitors are used as decoupling capacitors to protect the
Raspberry Pi from reboot due to motor’s sudden current draw. The full circuit diagram is created with Fritzing
and is shown to the right. (A LED is added so that a flashing LED tells that the system is running fine.)
For the electrical side, the essential part is the motor driver circuit, the set up where the
Raspberry Pi interacts with the air pump motor. The motor driver circuit contains a 1N4001 diode,
an air pump motor, two 2N2222 NPN BJT transistors and two 330 ohm resistors. The air pump motor I used
is rated at 6V and draws roughly 1A of current at peak. (Beware that Raspberry Pi
GPIO pin can only provide a maximum of 16mA [source].
And one should not use the GPIO pin to directly control or power any current consumed heavy component such as a motor.)
The 2N2222 NPN BJT transistor is a current
controlled current source. To avoid heating up the transistors, two transistors are used instead of
one. GPIO 19 and GPIO 26 of the Raspberry Pi are connected to the two transistors respectively with 330 ohm resistors in
between to limit the input current flow to base to be 3.3V/330 ohm = 10mA (Raspberry Pi GPIO pins are 3.3V).
Based on the datasheet, at room temperature (~25°C),
DC current gain of 2N2222 is at least 60 for standard application where I_C < 500mA. This means the motor
driver circuit supports total current drawn of at least 60*10mA*2 = 1.2A, which is greater than the 1A peak
current drawn of the air pump motor. The 1N4001 diode is used as a flyback diode to protect the transistor
from motor voltage spikes and back EMF. Two capacitors are used as decoupling capacitors to protect the
Raspberry Pi from reboot due to motor’s sudden current draw. The full circuit diagram is created with Fritzing
and is shown to the right. (A LED is added so that a flashing LED tells that the system is running fine.)
The software control code is shown below and can be found at this link.
1 2 3 4 5 6 7 8 9 10 11 12 13 14 15 16 17 18 19 20 21 22 23 24 25 26 27 28 29 30 31 32 33 34 35 36 37 38 39 40 41 42 43 44 45 46 47 48 49 50 51 52 53 | # water_plant.py uses GPIO 19 and 26 to turn on transistors, # which turn on the air pump motor to water the plant every # 1.5 days. # Xitang - 12/20/2018 # Import GPIO library and time library import RPi.GPIO as GPIO import time GPIO.setmode(GPIO.BCM) # Set GPIO Pins to be referred in Broadcom SOC channel # Set up Transistor Control GPIO Pins GPIO.setup(19, GPIO.OUT) GPIO.setup(26, GPIO.OUT) # Set up LED Debug GPIO Pin GPIO.setup(13, GPIO.OUT) # Set up Exit GPIO Pin GPIO.setup(17, GPIO.IN, pull_up_down=GPIO.PUD_UP) # Turn on the air pump motor for 2 seconds to water plant GPIO.output(19, GPIO.HIGH) GPIO.output(26, GPIO.HIGH) time.sleep(2) GPIO.output(19, GPIO.LOW) GPIO.output(26, GPIO.LOW) # Initialize variables water_interval_sec = 1.5 * 24 * 60 * 60 # 1.5 days start_time = time.time() counter = 0 while True: # If exit button is pressed, reset used GPIOs as inputs and exit if (not GPIO.input(17)): GPIO.cleanup() print("Exit Program") break # Water the plant every 1.5 days if ((time.time() - start_time) > water_interval_sec): start_time = time.time() counter = counter + 1 print (counter) GPIO.output(19, GPIO.HIGH) GPIO.output(26, GPIO.HIGH) time.sleep(2) GPIO.output(19, GPIO.LOW) GPIO.output(26, GPIO.LOW) print ("done") # Flash debug LED every 5 seconds time.sleep(4) GPIO.output(13, GPIO.HIGH) time.sleep(1) GPIO.output(13, GPIO.LOW) |
Result and Reflection
When I got back from winter break, the debugged LED was still blinking, so I knew the system was still running correctly. I saw that the water tank was half-empty, which meant that the Plant Watering Device had been watering our house plant when we were out.
One issue with the device was that it was an open loop design and lacked feedback of the water moisture level of the plant. Ideally, we would want this device to operate whenever the moisture level goes below a threshold instead of hardcoding a constant 2s motor operating time to run every 1.5 days. In fact, hardcoding a constant 2s motor operating time would fail to work after a certain point, because as more water got pumped out of the water tank, it required more air to pump the remaining water. A workaround is to add 0.3s to the motor operating time each time the device performed watering. Still, a better approach is to include feedback.
The laser cutted Plant Frame worked fine but wasn’t super sturdy, mainly because the connection between the top part and the left/right part wasn’t super strong. A more sturdy design can be made if a stronger connection was designed. I also added a camera on the left part initially and thought about streaming video online to monitor the plant remotely, but Canada can’t wait and I decided to head out for goods. Overall, I was satisfied with what was accomplished at one night to get our cute house plant taken care of during winter break.
Reference
- CAD file - Water Tank
- CAD file - Plant
- CAD file - Raspberry Pi 3 Model B+
- Youtube - How to Make Coca Cola Soda Fountain Machine